Frequently Asked Questions
Subscription
Account and Trial
The trial starts when you create a BigRingVR account. If you signed up but didn't have a chance to ride during the trial window, please send us an email and we can extend it.
To get started, visit our Delete Account page.
Video, Download and Streaming
Training Plans and Workouts
.zwo, .erg or .mrc files to your Workouts folder and they appear in
Training → Workouts next to the BigRingVR library. Choose Show → My workouts to see
them — the folder's location is shown right there.
Running the Application
Big-Ring\Rides folder under your Documents folder. They're saved as FIT files (.fit) by default. If you also want the older TCX format, set File format to “FIT and TCX” in Settings → General.
The ride clock keeps running while you're stopped, like on a ride outdoors, so leaderboard times stay fair and everyone on a live ride shares the same clock.
If you're riding a workout, it pauses by itself after 10 seconds without pedaling and picks up where you left off when you start again.
To ride several different routes back-to-back (not just laps of one loop), use Ride Queues — see the question below.
Alternatively, you can connect your trainer and sensors over Bluetooth instead, which needs no ANT+ dongle.
Alternatively, connect over Bluetooth, which needs no driver.
1. The ANT+ dongle you are using is not compatible with BigRingVR. We are aware of two brands — Anself and Cycplus — that are problematic because they do not support the complete ANT standard. You can read more here.
2. Another program may be occupying the dongle. Make sure all programs that might be using it (e.g. Garmin Express, Zwift) are closed.
3. The USB port the dongle is in may not provide enough power — try a different USB port.
You can also connect these devices over Bluetooth, which avoids ANT+ dongle issues entirely.
To do this from your phone, some riders use an app that turns the phone into a Bluetooth keyboard, such as Serverless Bluetooth Keyboard. This is an unofficial workaround rather than a built-in feature: it requires your phone to pair with your computer as a Bluetooth keyboard, which works on most setups but depends on your phone and operating system.
You can also right-click the video at any time for a menu with every command.
The Large map also zooms out one step, so it shows much more of the landscape around you. Press M to hide or show the map.
1. Other people will be able to ride against / with your efforts.
2. You will be able to ride against / with efforts of others.
3. You will be able to ride together with others in a live ride.
You can share your own rides with other riders: put the video and its control file on a cloud or file-sharing service, and others can download them and ride them locally in BigRingVR.
For GPX files, please make sure that:
1. The video file and control file have the same name, except for their extension (e.g. my_local_ride.mp4 and my_local_ride.gpx).
2. Supported codecs are H.264 and H.265; supported containers are MP4 and AVI.
3. The control file must be a GPX, CycleOps (.xml), RLV or PGMF file.
4. The GPX file must contain a track, and each track point must include a timestamp.
5. The GPX track and video file must start at the same location so the video and GPS track are in sync.
Big-Ring\Screenshots folder under your Documents folder.
Unfortunately, we cannot automatically upload them to Strava, as Strava does not offer that capability in their public API.
To add images to your Strava ride: open your ride in Strava, click 'Edit Activity', then drag images to the Photos section.
On Strava, TrainingPeaks and Intervals.icu it works the other way: when the rides genuinely join up on the road — each one starting within 50 m of where the previous finished — BigRingVR offers to upload the whole run as a single activity, so a route you rode in one continuous effort appears as one ride instead of several. Decline and you get one activity per ride.
The join is re-checked against the track you actually rode, not just the rides you queued — so if you stop partway through one of them, the run is split at that point instead of being merged with a straight line drawn across the map. Either way a “Queue complete” summary shows your combined totals at the end.
The theme is purely visual — it never changes which metrics appear or where they sit, which are the two settings beside it. This is also separate from the Theme menu in the left bar (or Settings → General → Theme), which styles the rest of the application rather than the ride screen.
Choose Remove it to tidy up, Not now to be asked again later, or Never remind me to keep the sensor and stop the prompt. Nothing is ever removed without your say-so.
BigRingVR only judges a sensor on rides where at least one other sensor connected — so browsing the catalog with your trainer switched off never counts against anything. ANT+ sensors aren't included.
Smart App Control can't allow a single app, so the only way past it is to switch it off, under Windows Security → App & browser control. It's a one-way setting — Windows doesn't offer a way to switch it back on later — while Microsoft Defender, SmartScreen and the firewall all carry on as normal. Full steps are on the download page.
Three fixes, in the order most likely to help:
Put the ANT+ dongle on a USB extension cable. USB 3 ports emit noise across the frequencies ANT+ uses, so a dongle plugged straight into the computer is often swamped. Moving it a foot or two away — and closer to the bike — fixes more dropouts than anything else.
Switch your computer to the 5 GHz Wi-Fi network, if the signal there is strong. That removes your Wi-Fi from the band your sensors use, and gives 4K video more bandwidth. If your setup is far from the router, though, a solid 2.4 GHz connection beats a weak 5 GHz one.
On 2.4 GHz, prefer router channel 1 or 6. ANT+ transmits on a fixed 2457 MHz, which sits inside Wi-Fi channel 11. Bluetooth hops between frequencies and copes better — so if ANT+ sensors drop while Bluetooth ones hold, that's the likely reason.
Full details are on the Using BigRingVR page.
Rings, Levels and Explorer
Rings measure how much riding you've done. Every ride earns Rings: 1 Ring for every kilometre you ride, plus 1 Ring for every 30 metres you climb.
For example, a 40 km ride with 600 m of climbing earns 40 + 20 = 60 Rings.
A ride that ends lower than it started gives back 1 Ring for every 30 metres it drops overall, but every ride earns at least half its kilometres. A 20 km loop that climbs 1,000 m and comes back down still earns 53 Rings; a 22 km descent that drops 1,200 m earns 11, half its kilometres.
Long flat rides and big climbs count alike, and speed doesn't come into it — a ride earns the same Rings whether you take one hour or three.
A full ride of Tour of Flanders (Part 1) earns about 36 Rings, Alpe d'Huez about 52, Mont Ventoux from Bédoin about 74 and the Stelvio from Prato about 90.
Each ride also gets a size: Short (under 25), Solid (25–40), Big (40–60), Huge (60–90) or Epic (90+).
Every ride counts: repeats, rides you finish over two sessions, and custom courses. A ride that works out at more than 100 Rings an hour is treated as a recording glitch and earns 0 — even a pro climbing all day stays well below that.
Your Rings add up to your rider level: Grey (from 0), Bronze (100), Silver (500), Gold (2,000), Diamond (7,500), Royal (20,000), Legend (40,000), Immortal (80,000), Transcendent (160,000) and Eternal (320,000).
Each level up to Transcendent has 5 stars along the way, so there's always a next step in sight. Legend is close to riding every route in our catalogue once. Your Rings add up for good, and levels never go down.
The Rider Level tile on your Dashboard shows your level and stars, your total Rings, a bar to your next star, how many Rings to your next star and level, this week's Rings, and when you'll reach the next level at your recent pace.
My Activities shows each ride's Rings and size, and so does each activity's page. In the v8 app, the Home screen shows the same Rider Level and Explorer tiles, and your recent rides there show the Rings each one earned. Every ride you upload to Strava also carries two extra lines in its description: the ride's Rings and your rider level.
Explorer shows how many of the rides in our catalogue you've completed, as a number and a percentage.
A ride counts once you've ridden it to the finish in one go, and riding it again doesn't add to the count. Resumed rides and custom courses earn Rings but don't count for Explorer. The rides page marks the rides you've completed, and Not ridden yet → on the Explorer tile lists the ones still waiting for you.
Using the Website
You can add rides to scheduled / favorites on the rides page. Make sure you are logged in — in the rightmost column, click the Star icon (favorite) or Bell icon (scheduled).
You can also add rides to scheduled / favorites on the individual Ride page.
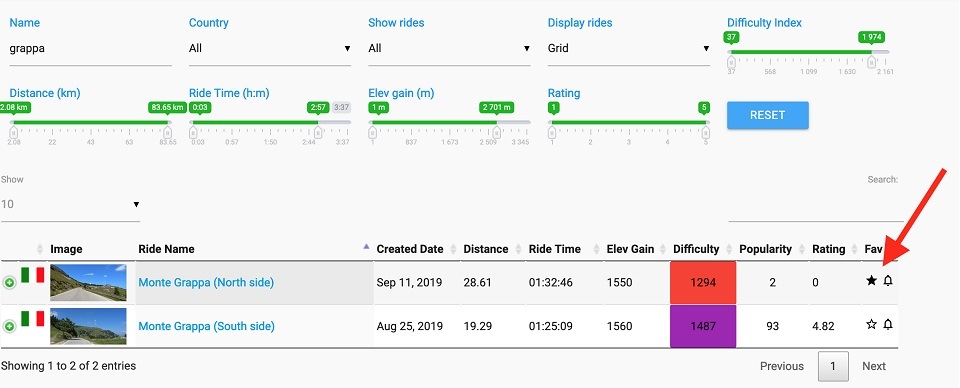
In the app, every ride card and ride page has the same ★ and 🔔 buttons as the website — it's the same favourites and schedule. To list only favourites or scheduled rides, open Rides → Filters → Show. Scheduled rides also appear on the Home screen.
Support
If you come across any issues, please report them here.
You can also contact us by email.
We would highly appreciate your Feedback.